
Embarking on a DIY journey to remove a kitchen faucet can be a game-changer for any homeowner. Not only does learning how to remove a kitchen faucet empower you to tackle plumbing issues head-on, but it also offers the satisfaction of personal accomplishment and potentially saves you a chunk of money on professional fees. Understanding the right steps and methods is crucial in ensuring a smooth and successful faucet removal. Whether it’s to upgrade your kitchen’s look, address leaks, or simply for a deep clean, removing your kitchen faucet can be a straightforward and rewarding task. With the right tools and a bit of know-how, you’ll find that this process is something any DIY enthusiast can manage, bringing a fresh perspective and functionality to your kitchen space.
What Is The Best Way To Loosen A Stuck Nut When Removing A Kitchen Faucet?
One effective way to loosen a stuck nut when removing a kitchen faucet is to use a penetrating oil, such as WD-40 or PB Blaster. Apply the oil generously to the nut and allow it to penetrate for at least 15-20 minutes before attempting to loosen it. The oil will help lubricate the threads and make it easier to break the nut free.
Can I Remove A Kitchen Faucet Without Any Special Tools?
Yes, you can remove a kitchen faucet without any special tools in some cases. Most kitchen faucets are designed to be easily installed and removed using basic household tools like an adjustable wrench or a pair of pliers. Before attempting to remove the faucet, make sure to turn off the water supply valves under the sink to prevent any leaks.
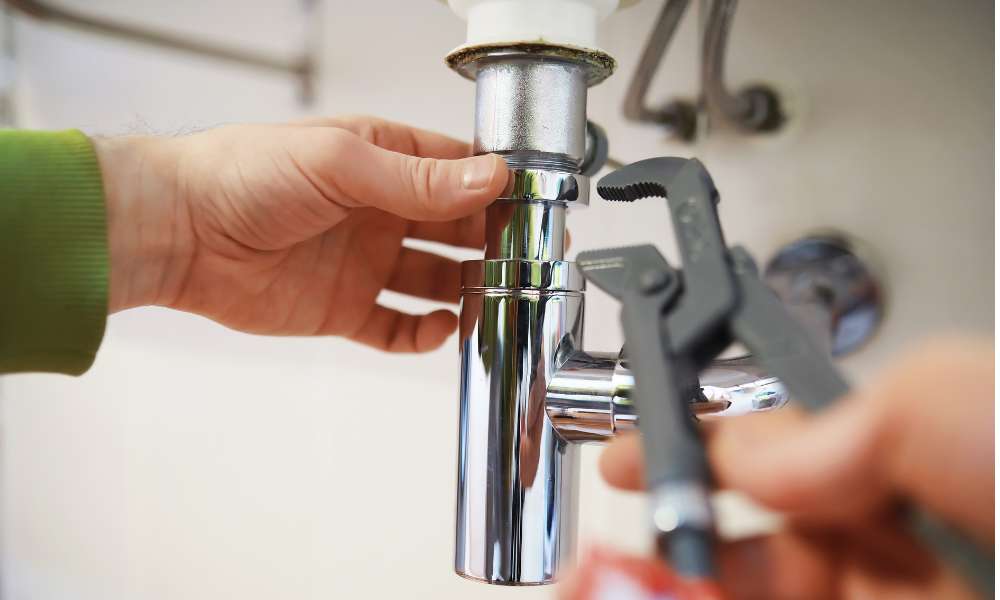
Disconnect Water Lines
Disconnecting water lines when removing a kitchen faucet may seem daunting, but with the right tools and knowledge, it can be a straightforward process. Start by turning off the water supply using the shut-off valves under the sink. Next, use an adjustable wrench to loosen and disconnect the water supply lines from the faucet connections. It’s important to have a bucket or towel handy to catch any excess water that may spill during this step.
Remove The Aerator
Removing the aerator from your kitchen faucet may seem like a simple task, but it can make a big difference in the functionality of your sink. One key benefit is that taking out the aerator allows for better water pressure, making tasks like washing dishes or filling pots quicker and more efficient. Additionally, removing the aerator also gives you the opportunity to clean and maintain this small yet essential part of your faucet, ensuring a longer lifespan for your fixture.
Loosen Mounting Nuts
Loosening mounting nuts may seem like a simple task, but there are often hidden challenges that can make it more difficult than expected. One key tip is to use the right tools for the job – a proper wrench or pliers can make all the difference in getting those nuts to budge. Additionally, applying some lubricant to the nuts before attempting to loosen them can help break up any rust or debris that may be causing them to stick.
Predispose Of Old Faucet
Replacing an old faucet is a relatively simple task that can greatly improve both the look and performance of your kitchen sink. With modern designs offering better efficiency and style options, upgrading your faucet can instantly elevate the appearance of your space. Before installing a new faucet, make sure to clean any leftover residue or grime from the area to ensure a smooth transition. Whether you opt for a sleek pull-down sprayer or a classic single-handle design, choosing a high-quality replacement will enhance both functionality and aesthetics in your kitchen while eliminating those pesky predisposed issues of an old faucet.
Understanding The Types Of Kitchen Faucets
Before diving into the task of removing your kitchen faucet, it’s essential to understand the various types you might encounter. This knowledge not only simplifies the removal process but also ensures you’re prepared with the right tools and methods.
1. Single-Handle Faucets
Single-handle faucets are quite common in modern kitchens, offering simplicity and ease of use. These faucets integrate the temperature and flow control into one mechanism, which means you’ll typically deal with fewer connections during the removal process. When preparing to remove a single-handle kitchen faucet, it’s crucial to identify the mounting style and any specific manufacturer instructions to avoid damage or unnecessary complications.
2. Double-Handle Faucets
Double-handle faucets feature separate controls for hot and cold water, offering precise temperature adjustment. The removal of these faucets might involve a few extra steps compared to their single-handle counterparts due to the additional water line. Paying close attention to the configuration of the supply lines and mountings will be key to successfully removing a double-handle kitchen faucet without any hitches.
3. Pull-Out And Pull-Down Faucets
Pull-out and pull-down faucets add functionality and style to the kitchen, allowing for easy rinsing and cleaning. Despite their added features, removing these types of faucets follows a similar basic procedure as standard faucets. However, extra care should be taken to manage the retractable spray hose that distinguishes them. Ensuring that the hose is not tangled or damaged during removal is essential for maintaining the faucet’s integrity.
4. Commercial Style Faucets
Commercial style faucets are known for their robustness and feature a high-arc design which is ideal for extensive kitchen tasks. Although they might look intimidating due to their size and complexity, removing a commercial style kitchen faucet is manageable with a step-by-step approach. Understanding the specific components and their assembly will guide you through a smooth removal process, avoiding potential issues with larger or more intricate setups.
Choosing Eco-Friendly Faucet Options
When it’s time to bid farewell to your old kitchen faucet, considering eco-friendly options can make a world of difference. Opting for a faucet that conserves water not only reflects a commitment to protecting the environment but also ensures savings on your water bill. Look for faucets with low flow rates or those equipped with aerators, which mix air with water to reduce usage without compromising pressure. Brands now offer stylish, green options that fit seamlessly into any kitchen design, proving that eco-conscious choices can be both practical and aesthetically pleasing. Remember, choosing an eco-friendly kitchen faucet is a small step with a big impact on our planet’s health.
Ensuring A Safe DIY Plumbing Project
Safety should be your top priority when you set out to remove a kitchen faucet. Before starting, make sure to turn off the water supply to prevent any unexpected water sprays or leaks. Always double-check that the area is dry and there’s no electrical equipment around that could pose a risk if it comes into contact with water. Wear protective gear like gloves and goggles to shield yourself from sharp edges and debris. By taking these precautions, you ensure that your project to remove a kitchen faucet is not only successful but also conducted in a safe manner, preventing any potential injuries or water-related mishaps.
Low Water Pressure Troubleshooting
After removing your kitchen faucet, you might encounter issues with low water pressure in your new installation. This common problem can often be traced back to clogged aerators or supply lines. To troubleshoot, first, inspect the aerator for any debris and clean it thoroughly. If the problem persists, check the water supply lines for kinks or blockages. Sometimes, the issue might be with the local water supply and out of your immediate control. Regular maintenance and vigilance can prevent these problems and ensure your faucet maintains optimal performance, making your effort to remove and replace your kitchen faucet truly worthwhile.
The Final Thought
Removing a kitchen faucet may seem like a daunting task, but with the right tools and knowledge, it can be a manageable project. By following the step-by-step guide provided in this article, you can successfully remove your kitchen faucet without causing any damage to your sink or plumbing. Remember to turn off the water supply before starting and take your time to carefully disassemble the faucet components. Once you have removed the old faucet, you can then proceed with installing a new one or making any necessary repairs. With patience and attention to detail, you can transform your kitchen by replacing the old faucet with a new one that suits your style and needs.