Replacing your kitchen faucet hose is a crucial task that not only ensures the smooth functioning of your kitchen’s plumbing but also contributes to the overall hygiene and efficiency of your cooking space. Understanding how to replace a kitchen faucet hose can empower homeowners, offering them a sense of independence while potentially saving on costly plumbing services. This guide will walk you through the benefits of tackling this task yourself, emphasizing the importance of maintaining your kitchen’s plumbing system for a well-running household. By learning to replace the kitchen spigot hose, you not only address immediate issues like leaks or wear and tear but also enhance the longevity and performance of your faucet, ensuring a clean and efficient kitchen environment. With clear, step-by-step instructions, you’ll find that this task is entirely manageable, providing you with a practical skill that upholds the functionality and aesthetics of your kitchen space.
What Tools Will I Need To Replace The Kitchen Faucet Hose?
To replace the kitchen faucet hose, you will need a few basic tools to get the job done efficiently. Firstly, you will need an adjustable wrench or a set of wrenches to loosen and tighten the connections. Additionally, having a pair of pliers can be helpful for removing any stubborn nuts or bolts. It’s also recommended to have a bucket or container handy to catch any water that may leak during the process.
Can I Replace The Kitchen Faucet Myself?
Yes, you can replace the kitchen faucet yourself if you have some basic plumbing skills and tools. Before starting the replacement process, make sure to turn off the water supply to the faucet. You will need to disconnect the old faucet by loosening the nuts and removing any screws holding it in place. Once the old faucet is removed, you can install the new faucet by following the manufacturer’s instructions.
Step-By-Step Instructions On How To Replace Kitchen Faucet Hose
Preparation
Gather the following tools and materials before starting the replacement:
1. Adjustable Wrench
An adjustable wrench is an indispensable tool when it comes to replacing a kitchen faucet hose. This versatile tool allows you to loosen and tighten nuts and fittings of various sizes with ease. Before starting, make sure your adjustable wrench is in good condition and adjust it to fit the nuts on your faucet assembly snugly. Using the correct size prevents the nuts from being stripped or damaged, facilitating a smoother replacement process.
2. Plumber’s Tape
Plumber’s tape, also known as thread seal tape or PTFE tape, is another critical component in the process of replacing your kitchen. This tape is designed to create a watertight seal on the threads where the hose connects to the faucet and the water supply lines. Before applying the plumber’s tape, clean the threads on the faucet and supply lines to ensure they’re free from debris or old tape residues. Wrap the plumber’s tape clockwise around the threads, typically three to four times, to ensure a secure seal. The tape should be snug but not overly tight, allowing the threads to engage properly without cross-threading. This step is vital in preventing leaks at the connection points and ensuring a long-lasting repair.
3. Towel Or Rag
Having a towel or rag on hand is essential when replacing your kitchen spigot hose. This simple tool plays a vital role in the process by helping you clean up any spilled water, dry the work area, and provide a clean surface for your tools and the new hose. Before you start, place a towel or rag under the sink to catch any drips or spills when you disconnect the old hose. It can also be used to clean off any debris or moisture from the connection points, ensuring a clean, dry environment for the new hose installation. Additionally, a towel can protect the skin’s surface from scratches or damage from tools during the replacement process. Keep a few extra towels or rags handy to address any unexpected spills, ensuring a clean and efficient workspace.
Locate Water Shut-Off Valves
Locating water shut-off valves in your home is essential for being prepared in case of a plumbing emergency. Knowing where these valves are located can save you time and money by quickly stopping the flow of water to prevent further damage. Take the time to familiarize yourself with the main shut-off valve, as well as individual shut-off valves for sinks, toilets, and appliances.
Turn Off Cold Water Supply
Once you’ve identified the shut-off valves, the next action is to turn off the cold water supply. This is a critical step in preparing to replace your kitchen spigot hose, as it ensures that water does not interfere with your work. Turning off the water supply is fundamental to a successful replacement, helping to avoid water waste and potential mess in your kitchen workspace. It’s a simple yet crucial measure that sets the stage for a smooth hose replacement, emphasizing the importance of this preparatory step in the overall process.
Tighten Any Loose Fittings
Before you install the new hose, it’s important to check and tighten any loose fittings. This preventive measure can save you from future leaks and complications. Fittings can become loose over time due to regular use or changes in temperature. By securing these fittings, you ensure a solid, leak-free connection for your new hose, reinforcing the reliability of your kitchen’s plumbing. This step is not just about tightening; it’s about ensuring your faucet’s longevity and optimal performance, reflecting the thoroughness required in maintaining kitchen fixtures.
Clean Faucet Aerator
The faucet aerator, often overlooked, plays a key role in your faucet’s function, affecting water flow and quality. Before attaching the new hose, take the opportunity to clean this component. A clean aerator helps maintain proper water flow and prevents splashing, enhancing your faucet’s efficiency. This cleaning process can also remove any debris or sediment buildup, ensuring that your faucet delivers clean, clear water once the new hose is in place. This maintenance task, simple yet impactful, contributes significantly to the overall success of your faucet hose replacement.
Use Adjustable Wrench To Tighten Fittings
Utilizing an adjustable wrench to tighten fittings provides a practical solution for various maintenance tasks around the house, from fixing leaky pipes to upgrading kitchen fixtures. By mastering this simple yet crucial tool, homeowners can take on small repairs confidently without having to rely on professional help. Investing in a quality adjustable wrench is like having a multi-tool at your disposal for all your tightening needs – making home improvement projects smoother and more manageable.
Wipe Down Any Water Spills
During the process of replacing your kitchen spigot hose, water spills are almost inevitable. It’s important to promptly wipe down any spills to prevent water damage to your cabinet and sink area. Water left on surfaces can lead to mold or mildew, which can compromise the materials and hygiene of your kitchen space. Keeping the area dry also provides a safer working environment, reducing the risk of slips or falls. This step, while simple, underscores the attention to detail necessary for a successful faucet hose replacement, maintaining a clean and safe workspace throughout the process.
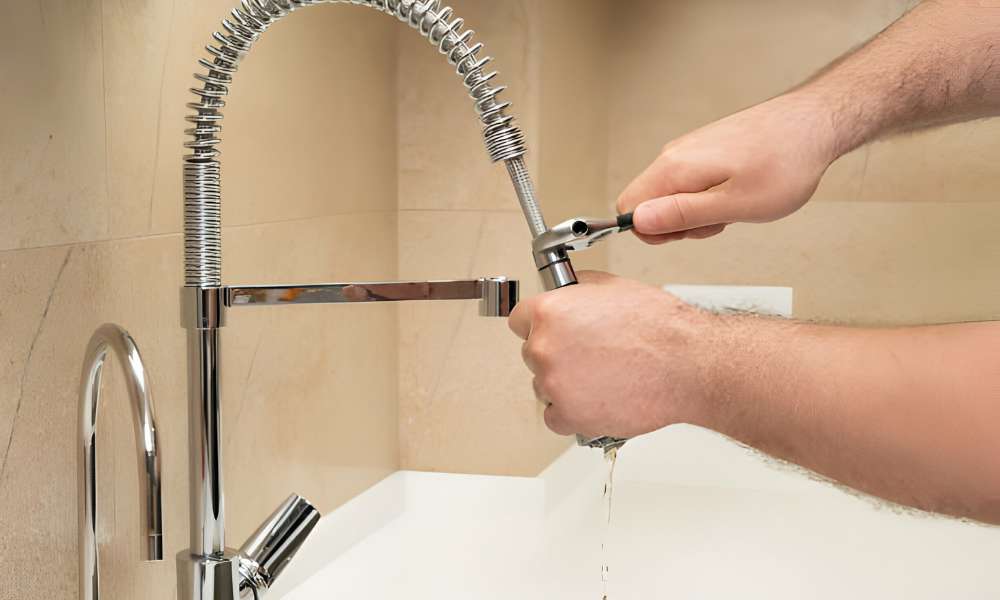
Detaching The Hose From The Faucet
Detaching the hose from the faucet is a critical step in the replacement process. This involves carefully unscrewing the connections that hold the hose in place, often requiring a gentle yet firm approach to avoid damaging the faucet or hose. It’s crucial to understand the specific connection mechanism your faucet uses, as this can vary between different models and manufacturers. Properly detaching the hose ensures that you can smoothly transition to installing the new one, laying the groundwork for a successful replacement. This step not only involves physical detachment but also a keen awareness of the faucet’s assembly to ensure everything is reconnected correctly during the installation of the new hose.
Adjusting Handles For Proper Water Flow
Adjusting the handles on your kitchen faucet is essential for ensuring proper water flow and efficiency in your daily tasks. To optimize water flow, start by turning off the water supply to the faucet. Next, remove the handle caps and unscrew the handles to access the cartridge inside. Adjusting the cartridge can help regulate water pressure and temperature, providing a more comfortable experience while using the faucet.
Organizing Tools For Future Use
Organizing tools for future use can save you time and frustration when tackling home improvement projects like replacing a kitchen spigot hose. Having a dedicated toolbox with all the necessary tools neatly arranged can make the job much easier and more efficient. Consider organizing tools by category, such as plumbing tools, electrical tools, or general household tools, to quickly locate what you need.
Confirming No Leaks Or Drips
After successfully replacing your kitchen spigot hose, it’s crucial to confirm that there are no leaks or drips. Even a small drip can lead to water wastage and potentially damage your sink cabinet over time. To ensure a leak-proof installation, check all connections and joints thoroughly for any signs of moisture. Tighten them if necessary to prevent future leaks.
The Final Thought
Replacing a kitchen faucet hose can seem like a daunting task, but with the right tools and knowledge, it can be a straightforward process. By following the step-by-step guide outlined in this article, you can easily replace your kitchen faucet hose and ensure that your sink functions properly. Remember to turn off the water supply before beginning the replacement process to avoid any mishaps. With patience and attention to detail, you can successfully complete this DIY project and enjoy a leak-free kitchen spigot once again. Take the time to properly maintain your kitchen fixtures for long-lasting functionality.